Remote Desktop and AzureAD
Windows 11 Remote Desktop is a powerful feature that allows you to access your computer remotely, whether from another PC, smartphone, or tablet. Whether you’re traveling, working from home, or simply helping a friend or family member with a technical issue, this option offers you great flexibility.
In this article, we’ll walk you through the steps to enable Remote Desktop on Windows 11, check the necessary permissions, and connect securely—including when authenticating via AzureAD.
Enable Remote Desktop
To enable Windows 11 Remote Desktop on your PC, you must:
- Open the Windows Settings
- Click the Start button (or press the Windows key).
- Select Settings (gear icon).
- Access Remote Desktop settings
- In the left-hand menu, click on System.
- Then select Remote Desktop.
- Enable Remote Desktop
- Turn on the Enable Remote Desktop switch.
- A confirmation window may appear: click on Confirm.
- Check permissions
- Make sure your user account has a password.
- Check that your account is authorized to connect remotely (by default, administrators are).
- Configure network settings
- To access your PC remotely, it must be connected to a network and not in sleep mode.
- If you want to connect from outside your local network, configure port forwarding on your router (TCP port 3389).
Use the Remote Desktop Connection application
On another device (Windows, macOS, Android, iOS), open the Remote Desktop Connection app. Enter the computer name or IP address, then log in with your credentials.
⚠️ On your remote PC, if you are authenticated using an AzureAD account, you must:
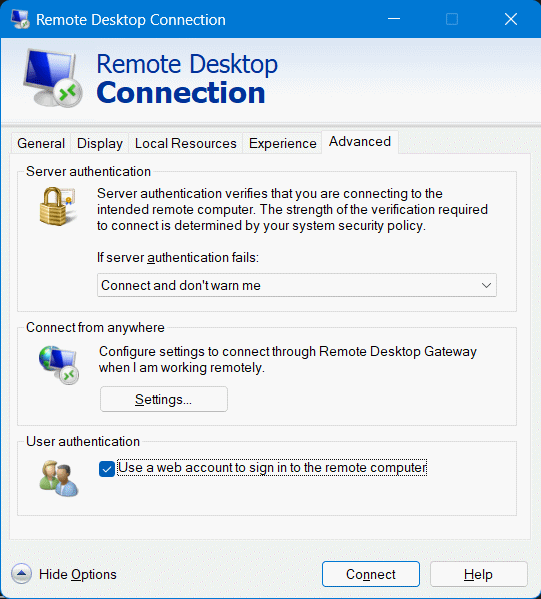
- Display the options in the Remote Desktop Connection window.
- In the General tab and the Computer field, you must enter the name of the PC (not its IP address).
-
In the Advanced tab, check the Use a web account to authenticate box. This opens a web authentication window, which may include two-factor authentication.