

Blazor - Authentication using Cookie
To authenticate a user, Blazor Server uses the same components as ASP.NET Core.
The principle is to inject the service services.AddAuthentication().AddCookie()
and call the HttpContext.SignInAsync method, specifying the appropriate Claims.
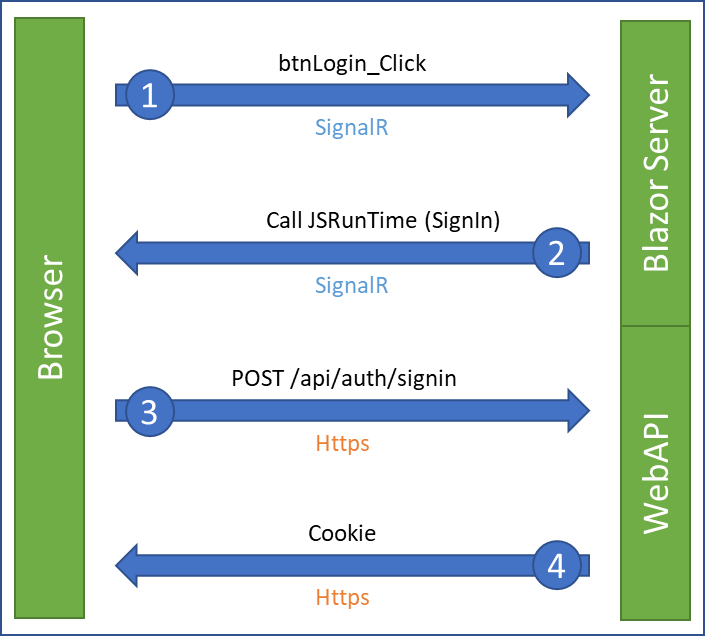
But the main problem is that Blazor Server uses SignalR to communicate between the web browser and the server. This prevents the correct transfer of cookies. It is therefore necessary to define WebAPIs and to call them using Http.
To help you understand the development of these different steps, I have recorded a video that shows the creation of a Blazor Server project and the integration of all the steps to secure a page or components.
Video - How to create an authenticated Blazor Server project
The complete source code is available here.
1. Creation of the WebAPI
As mentioned in the introduction, Blazor Server cannot send the cookie via SignalR, its usual communication protocol for exchanging its state changes between the browser and the server.
It is therefore necessary to create a WebAPI api/auth/signin to connect (which takes an Email/Password object as argument) and another one to disconnect api/auth/signout.
It is also possible to create GET APIs but the login, and especially the password (even hashed) will be sent in the navigation URL. Personally, I prefer to define APIs of type POST to avoid this.
- SignInPost builds the set of claims that identify the user, as well as the properties of the of the cookie (lifetime, persistence, …). It remains to call the HttpContext.SignInAsync method provided as standard by Microsoft to generate an encrypted cookie.
- SignOutPost calls the HttpContext.SignOutAsync method also provided by Microsoft to destroy the cookie.
See the Microsoft’ documentation: Create an authentication cookie
[ApiController]
public class AuthController : ControllerBase
{
    private static readonly AuthenticationProperties COOKIE_EXPIRES = new AuthenticationProperties()
    {
        ExpiresUtc = DateTimeOffset.UtcNow.AddMinutes(10),
        IsPersistent = true,
    };

    [HttpPost]
    [Route("api/auth/signin")]
    public async Task<ActionResult> SignInPost(SigninData value)
    {
        var claims = new List<Claim>
        {
            new Claim(ClaimTypes.Email, value.Email),
            new Claim(ClaimTypes.Name,  value.Email),
            new Claim(ClaimTypes.Role,  "Administrator"),
        };

        var claimsIdentity = new ClaimsIdentity(claims,
                                                CookieAuthenticationDefaults.AuthenticationScheme);
        var authProperties = COOKIE_EXPIRES;

        await HttpContext.SignInAsync(CookieAuthenticationDefaults.AuthenticationScheme,
                                      new ClaimsPrincipal(claimsIdentity),
                                      authProperties);

        return this.Ok();
    }

    [HttpPost]
    [Route("api/auth/signout")]
    public async Task<ActionResult> SignOutPost()
    {
        await HttpContext.SignOutAsync(CookieAuthenticationDefaults.AuthenticationScheme);
        return this.Ok();
    }
}

public class SigninData
{
    public string Email { get; set; }
    public string Password { get; set; }
}
2. JavaScript code to call the APIs
This second step consists in adding a JS script to call in HTTPS (and not in SignalR) the APIs we have just written.
This auth.js file is placed in the wwwroot/js folder to be accessible by the Blazor engine
when the application is executed. The functions are prefixed with export to allow them to be used
as JavaScript isolation modules.
-
SignIn is a method that calls the API to login, in POST mode, with content serialized to JSON. Once a positive response is received from the API, the code redirects the user to an URL specified in the argument.
-
SignOut is a method that calls the API to logoff, in POST mode. Once a positive response is received from the API, the code redirects the user to an URL specified in the argument.
export function SignIn(email, password, redirect) {

    var url = "/api/auth/signin";
    var xhr = new XMLHttpRequest();

    // Initialization
    xhr.open("POST", url);
    xhr.setRequestHeader("Accept", "application/json");
    xhr.setRequestHeader("Content-Type", "application/json");

    // Catch response
    xhr.onreadystatechange = function () {
        if (xhr.readyState === 4) // 4=DONE
        {
            console.log("Call '" + url + "'. Status " + xhr.status);
            if (redirect)
                location.replace(redirect);
        }
    };

    // Data to send
    var data = {
        email: email,
        password: password
    };

    // Call API
    xhr.send(JSON.stringify(data));
}

export function SignOut(redirect) {

    var url = "/api/auth/signout";
    var xhr = new XMLHttpRequest();

    // Initialization
    xhr.open("POST", url);
    xhr.setRequestHeader("Accept", "application/json");
    xhr.setRequestHeader("Content-Type", "application/json");

    // Catch response
    xhr.onreadystatechange = function () {
        if (xhr.readyState === 4) // 4=DONE
        {
            console.log("Call '" + url + "'. Status " + xhr.status);
            if (redirect)
                location.replace(redirect);
        }
    };

    // Call API
    xhr.send();
}
3. Connecting and disconnecting
Now that the WebAPIs and the associated JavaScript code are developed we can use them in our page.
In this example, we modify the Counter page to place two buttons (Login and Logout)
and to call the two JavaScript methods.
To do this, we need to inject the JSRunTime.
The line var authModule = ... downloads the specified JavaScript file
and put it in memory in the component to use its methods.
@page "/counter"
@inject IJSRuntime JSRunTime

<button @onclick="btnLogin_Click">Login</button>
<button @onclick="btnLogout_Click">Logout</button>

@code {

    private async void btnLogin_Click()
    {
        var authModule = await JSRunTime.InvokeAsync<IJSObjectReference>("import", "./js/auth.js");
        await authModule.InvokeVoidAsync("SignIn", "denis@voituron.net", "MyPassword", "/");
    }

    private async void btnLogout_Click()
    {
        var authModule = await JSRunTime.InvokeAsync<IJSObjectReference>("import", "./js/auth.js");
        await authModule.InvokeVoidAsync("SignOut", "/");
    }
}
4. Injection of authentication services
We still have to inject the Cookie authentication services to be able to use it in our application.
-
In the
Startup.csfile, inject the controllers for the WebAPIs and the Cookie authentication service. Specify the name of the cookie (e.g. myauth) and the desired security. -
In the
Startup.csfile, use authentication (UseAuthentication) and controllers (MapControllers).
// Startup.cs
public void ConfigureServices(IServiceCollection services)
{
    // ... Existing services ...

    services.AddControllers();
    services.AddAuthentication(CookieAuthenticationDefaults.AuthenticationScheme)
            .AddCookie(options =>
            {
                options.Cookie.Name = "myauth";
                options.Cookie.SameSite = Microsoft.AspNetCore.Http.SameSiteMode.Strict;
            });
}

public void Configure(IApplicationBuilder app, IWebHostEnvironment env)
{
    // ... Existing services ...

    app.UseAuthentication();
    app.UseEndpoints(endpoints =>
    {
        endpoints.MapControllers();
        endpoints.MapBlazorHub();
        endpoints.MapFallbackToPage("/_Host");
    });
}
- In the
App.razorfile, adapt it as follows:- Add the
CascadingAuthenticationStatetag. - Modify the
Foundtag to remove the defaultRouteViewand replace it by anAuthorizeRouteViewwhich contains the text to be displayed when authorization is denied and the text to be displayed when the authorization procedure takes time (Blazor pages are displayed asynchronously).
- Add the
<!-- App.razor -->
<CascadingAuthenticationState>
    <Router AppAssembly="@typeof(Program).Assembly" PreferExactMatches="@true">
        <Found Context="routeData">
            <!-- <RouteView RouteData="@routeData" DefaultLayout="@typeof(MainLayout)" /> -->
            <AuthorizeRouteView RouteData="@routeData" DefaultLayout="@typeof(MainLayout)">
                <NotAuthorized>
                    <h1>Sorry</h1>
                    <p>You're not authorized to reach this page.</p>
                    <p>You may need to log in as a different user.</p>
                </NotAuthorized>
                <Authorizing>
                    <h1>Authorization in progress</h1>
                    <p>Only visible while authorization is in progress.</p>
                </Authorizing>
            </AuthorizeRouteView>
        </Found>
        <NotFound>
            <LayoutView Layout="@typeof(MainLayout)">
                <p>Sorry, there's nothing at this address.</p>
            </LayoutView>
        </NotFound>
    </Router>
</CascadingAuthenticationState>
5. Securing pages and components
A. Now secure your pages by adding the attribute [Authorize]
(possibly specifying access roles).
If the user is not known, he will receive the message contained in the App.razor page.
@page "/fetchdata"
@attribute [Authorize]

<h1>Weather forecast</h1>
B. You can also secure your components with the <AuthorizeView> tag.
<AuthorizeView>
    <h3>Hello World @(context.User.Identity.Name)</h3>
</AuthorizeView>
6. (optional) Validation customization
If necessary, it is also possible to capture validation events from authentication cookies. This makes it very easy to inject a data access service (e.g. Factory in this example) to connect to a database and guarantee that the user still exists correctly, with the right access roles.
- CookieAuthenticationEvents is a class that inherits and overrides the class proposed by Microsoft.
public class CookieAuthenticationEvents : Microsoft.AspNetCore.Authentication.Cookies.CookieAuthenticationEvents
{
    //private readonly Factory _factory;

    //public CookieAuthenticationEvents(Factory factory)
    //{
    //    _factory = factory;
    //}

    public override async Task ValidatePrincipal(CookieValidatePrincipalContext context)
    {
        // Validate the Principal
        var userPrincipal = context.Principal;

        // If not valid, Sign out
        if (userPrincipal.Identity.Name != "denis@voituron.net")
        {
            context.RejectPrincipal();
            await context.HttpContext.SignOutAsync(CookieAuthenticationDefaults.AuthenticationScheme);
        }
    }
}
- options.EventsType is an option to select the validation class of the cookie. It is necessary to inject this class to specify to Blazor how to build this object.
services.AddAuthentication(CookieAuthenticationDefaults.AuthenticationScheme)
        .AddCookie(options =>
        {
            options.Cookie.Name = "myauth";
            options.Cookie.SameSite = Microsoft.AspNetCore.Http.SameSiteMode.Strict;
            // Add this new line
            options.EventsType = typeof(CookieAuthenticationEvents);    // <---
        });
// Add this new line
services.AddScoped<CookieAuthenticationEvents>();   // <---
The complete source code is available here.