

How to create a WebAPI authenticated by JWT?
JSON Web Token (JWT) is an open standard (RFC 7519) to exchange information securely via a signed token. For example, a server could issue a token with the claim “user identified as an administrator” and provide it to the client. The client could then check the token to prove that the user is logged in as an administrator.
Personally, it is a solution that I find elegant because
- Simple to set up: a few configuration lines and the use of the
Authorizeattribute, - Easily manage my own security rules when checking the username and password,
- Very easy to test in client applications: just add an HTTP header
Authorization: Bearer [Token].
General flow
The principle is to call a method that generates a JWT Token, containing an expiration date and some meta-data, and signed to avoid alterations. This token is then sent to all requests via the HTTP header.
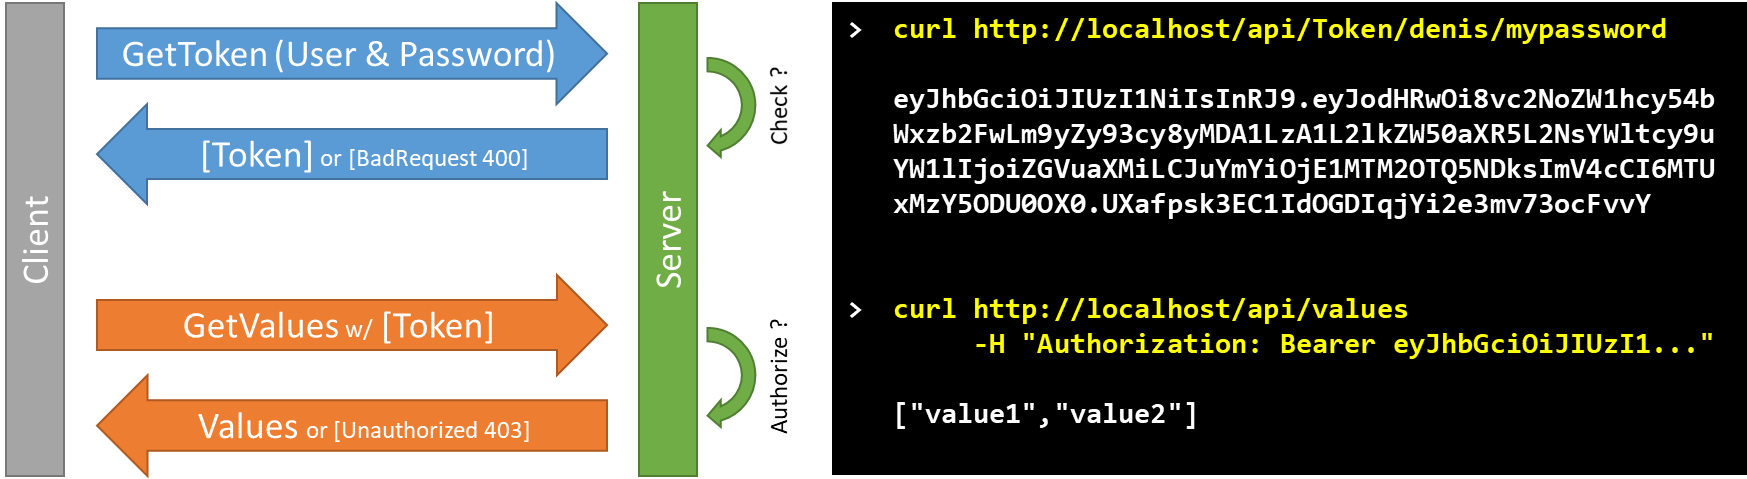
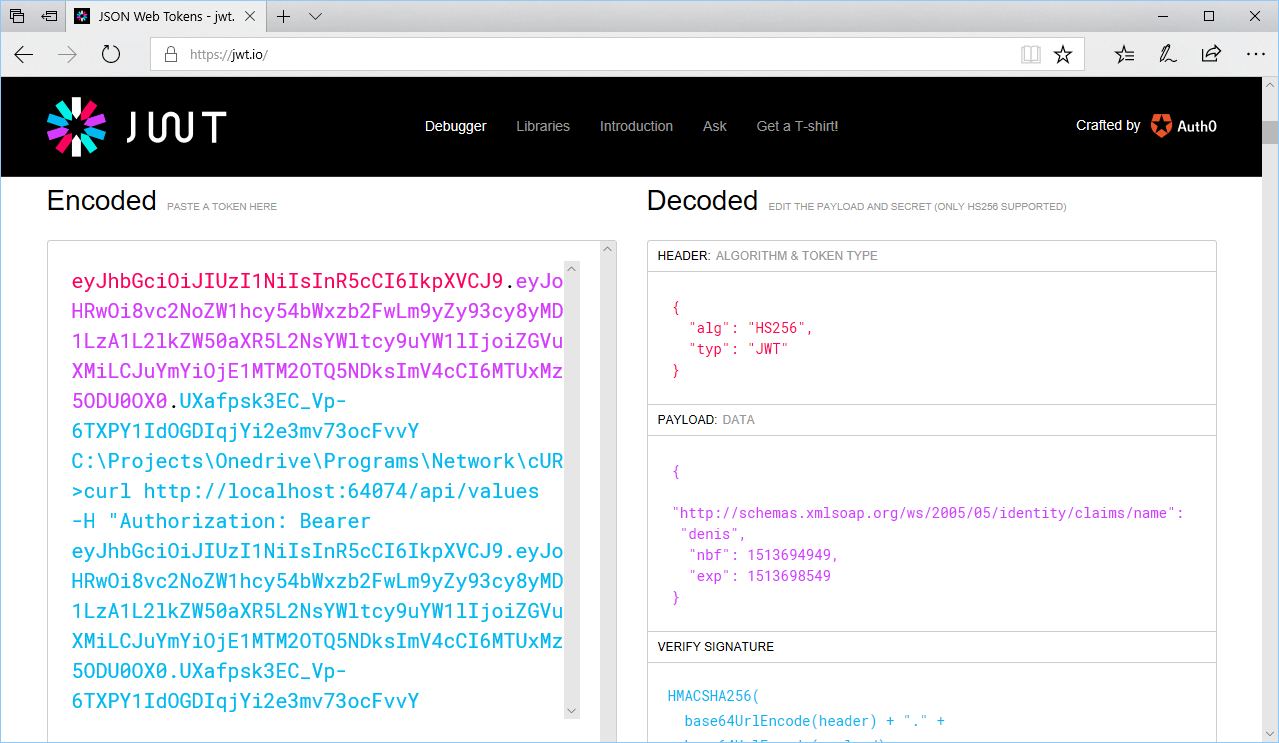
Once you have generated a JWT token, you can easily validate it from http://jwt.io.
Contents of the JWT token
A JWT token consists of three parts: a header, a payload and a signature:
- The header indicates which algorithm is used to generate the signature (e. g. HMAC-SHA256).
- The Payload is content according to the application. It is indicated in the JWT specifications to include a time stamp in the creation: nbf (not before - date and time after of use) and exp (expiration date and time).
- The signature is obtained via the algorithm specified in the header applied to the token and key. It ensures that the Token has not been modified since its creation.
Configuring WebAPIs
The first step is to create an ASP.NET Core project, via Visual Studio or VSCode. It will be able to host your WebAPIs.
- First of all, it is necessary to add the Nuget packages IdentityModel.Tokens.Jwt and System.Runtime.Serialization.Json.
- Next, adapt the Startup.cs class to configure the JWT service.
public class Startup
{
    public void ConfigureServices(IServiceCollection services)
    {
        services.AddMvc();

        // Configure the JWT Authentication Service
        services.AddAuthentication(options =>
        {
            options.DefaultAuthenticateScheme = "JwtBearer";
            options.DefaultChallengeScheme = "JwtBearer";
        })
        .AddJwtBearer("JwtBearer", jwtOptions =>
        {
            jwtOptions.TokenValidationParameters = new TokenValidationParameters()
            {
                // The SigningKey is defined in the TokenController class
                IssuerSigningKey = TokenController.SIGNING_KEY,
                ValidateIssuer = false,
                ValidateAudience = false,
                ValidateIssuerSigningKey = true,
                ValidateLifetime = true,
                ClockSkew = TimeSpan.FromMinutes(5)
            };
        });
    }

    public void Configure(IApplicationBuilder app, IHostingEnvironment env)
    {
        app.UseAuthentication();  // Must be before app.UseMvc
        app.UseMvc();
    }
}
- Create the TokenController.cs class to create the method to generate the token.
public class TokenController : Controller
{
    private const string SECRET_KEY = "TQvgjeABMPOwCycOqah5EQu5yyVjpmVG";
    public static readonly SymmetricSecurityKey SIGNING_KEY = new
                  SymmetricSecurityKey(Encoding.UTF8.GetBytes(SECRET_KEY));

    [HttpGet]
    [Route("api/Token/{username}/{password}")]
    public IActionResult Get(string username, string password)
    {
        if (username == password)
            return new ObjectResult(GenerateToken(username));
        else
            return BadRequest();
    }

    // Generate a Token with expiration date and Claim meta-data.
    // And sign the token with the SIGNING_KEY
    private string GenerateToken(string username)
    {
        var token = new JwtSecurityToken(
            claims:    new Claim[] { new Claim(ClaimTypes.Name, username) },
            notBefore: new DateTimeOffset(DateTime.Now).DateTime,
            expires:   new DateTimeOffset(DateTime.Now.AddMinutes(60)).DateTime,
            signingCredentials: new SigningCredentials(SIGNING_KEY,
                                                SecurityAlgorithms.HmacSha256)
            );

        return new JwtSecurityTokenHandler().WriteToken(token);
    }
}
- The last step is to add [Autorize] attribute to reduce access to some methods.
[Route("api/[controller]")]
public class ValuesController : Controller
{
    // GET api/values
    [HttpGet]
    [Authorize]
    public IEnumerable<string> Get()
    {
        return new string[] { "value1", "value2" };
    }
}
Verification of secured methods
When running your WebAPI project, you can no longer call the action “api/values”: you will receive an error like “401. Unauthorized”. To be able to perform this action without error, you must first obtain a Token and use it in the request header.
To test your queries, you can use Postman or the cURL command
Example with cURL (see the video to use Postman). The flag “-i” include the HTTP response headers in the output.
$> curl -i http://localhost/api/values

  HTTP/1.1 401 Unauthorized
  WWW-Authenticate: Bearer
  X-Powered-By: ASP.NET
  Content-Length: 0
$> curl -i http://localhost/api/token/denis/mypassword

  HTTP/1.1 200 OK
  X-Powered-By: ASP.NET

  eyJhbGciOiJIUzI1NiIsInR5cCI6IkpXVCJ9.eyJodHRwOi8vc2NoZW1hcy54bWxzb2Fw
  Lm9yZy93cy8yMDA1LzA1L2lkZW50aXR5L2NsYWltcy9uYW1lIjoiZGVuaXMiLCJuYmYiO
  jE1MTM3MDM5OTIsImV4cCI6MTUxMzcwNzU5Mn0.LepDs7Rm6bvcANUDHI2QaKW0A8ooN5
  iuALl7k9400HU
$> curl -i http://localhost/api/values -H "Authorization: Bearer eyJhbGciOi...”

  HTTP/1.1 200 OK
  Content-Type: application/json; charset=utf-8
  X-Powered-By: ASP.NET

  ["value1","value2"]
Conclusion
JSON Web Token (JWT) is an open standard that requires only a few lines of configuration and makes it easy to secure WebAPIs developed in C#. This protocol being standardized, it is compatible with other platforms and languages: Java, Python, JavaScript, Go, Ruby, …
The token used during data exchanges is signed and can contain your own meta-data. It is also very easy to integrate WebAPIs into unit test projects and decrypt values if necessary.
In a future article, we will see how to consume these secure WebAPIs, in Angular 4 projects: creating a HttpInterceptor class that automatically adds the token to all web queries.