In MVVM development, you need to define some items collections bindable to your User Interface (View).
First, you must create your collection and items, next, you can create some samples and finally you need to bind these objects to your View (UI).
Since Visual Studio 2013, it's possible to create your Views and bind data directly in the Visual Editor (without know XAML).
All of that is available for Windows WPF, Windows Phone 8.1, Windows Store Apps, or Windows Universal Apps.
In the following example, I create all classes and XAML code from scratch. This example is a list of contacts grouped by letter's category.
1. Create the ViewModel
First, we need write all items and collections classes like that.
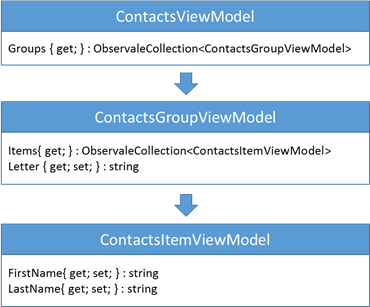
The following code defines these 3 classes.
```csharp
using System;
using System.Collections.ObjectModel;
namespace MyApplication.ViewModel
{
public class ContactsViewModel
{
public ContactsViewModel() { this.Groups = new ObservableCollection In the section 3 (below), we'll use a sample data items to bind with our User Interface… in design mode and/or in runtime mode.
First, create a XAML file with a reference to your ViewModel to easier fill sample items.
```xml
And create an associated class to load this XAML file in memory.
```csharp
using System;
namespace MyApplication.SampleData
{
public class ContactSample : ViewModel.ContactsViewModel
{
public ContactSample()
{
Uri resourceUri = new Uri("ms-appx:/SampleData/ContactsSample.xaml", UriKind.RelativeOrAbsolute);
Windows.UI.Xaml.Application.LoadComponent(this, resourceUri);
}
}
}
```
Add a new Blank Page (right-click / Add / New Item) and drop a ListView or a GridView in your main screen (from the toolbox).
In your new Page, go in the top of XAML file to add this code (a CollectionViewSource and a DataContext):
```xml
<Page …
xmlns:sample="using:MyApplication.SampleData" />
Note that d:Page.DataContext defines a DataContext to our ContactSample data, only in Design Mode. So, in runtime you can fill your ViewModel with real data.
That's all for coding: all of following steps will be only in visual mode in Visual Studio.
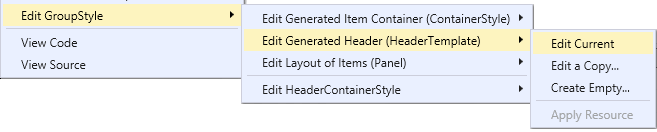
Switch your interface from XAML to Design mode (menu View / Designer), and select the ListView control. Right-click on the ListView and choose the command Add GroupStyle. So, the command GroupStyle / HeaderTemplate is available. And now, go to edit the current Header Template.
And draw as you want: add a Grid and a TextBlock… and bind the
TextBlock.Text property to the Letter property of your SampleData.Groups collection item.
Right-click on the ListView and choose the command Edit ItemTemplate / Create Empty. And choose a name for this ItemTemplate (ex. ContactItemTemplate).
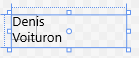
And draw as you want (a Grid, 2 TextBlock)… and bind the TextBox.Text to LastName and FirstName of a contact item.
That's all… you can unhide the ListView or run this application to display a contact list grouped by letter. Of course, in runtime, you need select correct data (not sample from xaml) and sort all contacts by first letter.
2. Fill the ViewModel with sample data
3. Draw your User Interface (View).
a. Create a new Page with a ListView.
b. Create a CollectionViewSource in your page.
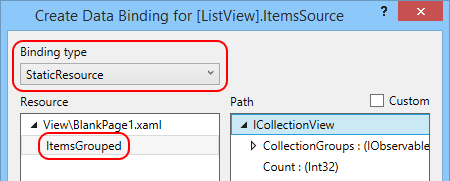
c. Set the ListView.ItemsSource
Press F4 to display the ListView control properties and click on the square next to ItemsSource property, and choose the Create DataBinding command.
Define the Binding type to a StaticResource, select your resource ItemsGrouped and click on OK.
d. Define a look for the HeaderTemplate.
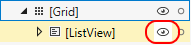
Before to draw visually your Group Header box, hide this listview ;-) For me, it's a bug in Visual Studio.

e. Define a look for the ItemTemplate.