

Enable TCP/IP Remote Connection on SQL Server 2008
Introduction
Whenever I use a physical or a virtual machine containing SQL Server, I do not know easily create a SQL remote access to the server. By default, SQL Server Express doesn’t allow remote connection, but sometimes, a classic SQL Server Installation doesn’t active some features, like firewall access or correct authorizations.
This article explains how to:
- Enable TCP/IP protocol and Set a predefined port number (1433) to listener all remote SQL requests.
- Add a firewall rule to allow inbound traffic to SQL Server.
- Disable SQL Server Browser Service for security reasons.
Typical errors
Some typical errors can occur if your server is not correctly configured.
- Cannot connect to SQL-Server-Instance-Name. An error has occurred while establishing a connection to the server. When connecting to SQL Server, this failure may be caused by the fact that under the default settings SQL Server does not allow remote connections. (provider: SQL Network Interfaces, error: 28 – Server doesn't support requested protocol) (Microsoft SQL Server).
- Cannot connect to SQL-Server-Instance-Name. An error has occurred while establishing a connection to the server. When connecting to SQL Server, this failure may be caused by the fact that under the default settings SQL Server does not allow remote connections. (provider: SQL Network Interfaces, error: 26 – Error Locating Server/Instance Specified) (Microsoft SQL Server).
- Cannot connect to SQL-Server-Instance-Name. Login failed for user 'username'. (Microsoft SQL Server, Error: 18456).
To enable remote connection on SQL Server 2008
1. Enable TCP/IP protocol and set a predefined port number (1433)
To enable the TCP/IP protocol for SQL Server 2008, to accept remote connection:
- Open SQL Server Configuration Manager. Click Start / Programs / Microsoft SQL Server 2008 R2 / Configuration Tools / SQL Server Configuration Manager.
- Expand SQL Server Network Configuration / Protocols for [Instance Name]. If you see that TCP/IP protocol status is disabled, right click to Enabled it.
-
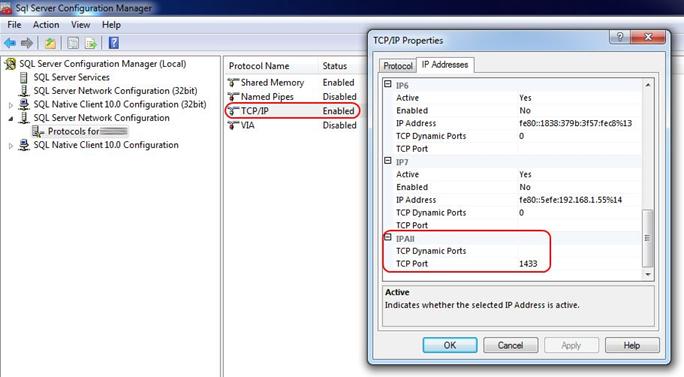
Open TCP/IP properties to set the correct listening port:
- In Protocol / General, set Enabled = Yes.
- In IP Addresses / IPAll, set TCP Port = 1433 and TCP Dynamic Port = an empty string (to disable the dynamic port).
- Restart SQL Server Service. Click SQL Server Services in the left panel, right click on SQL Server and select Restart action.
2. Add a firewall rule
By default, windows don’t allow inbound traffic from 1433 port. To allow inbound traffic to SQL Server:
- Open Windows Firewall with Advanced Security. Click Start / Control Panel / System and Security / Windows Firewall / Advanced Settings.
- Select Inbound Rules (in left panel), and click on New Rules (in Actions panel).
-
Complete all wizard steps like:
- Rule Type = Port.
- Protocol and Port = TCP on specific local port 1433.
- Action = Allow the connection.
- Profile = Domain, Private, Public.
- Name = SQL Server TCP/IP (1433).

3. Stop SQL Server Browser Service
Please, for security reasons disable the service SQL Server Browser. This service is not a requirement to accept remote (or local) connection to SQL Server!
- Open SQL Server Configuration Manager (see the previous step 1).
-
Click SQL Server Services in the left panel, right click on SQL Server Browser and select Properties action.
- In Log On tab, click on Stop button.
- In Service tab, set Start Mode to Manual.
4. Check SQL Server Authentication
Eventually, check the authentication mode set in SQL Server.
- Open Microsoft SQL Server Management Studio and connect you to SQL server.
- Right click on your SQL instance and select Properties.
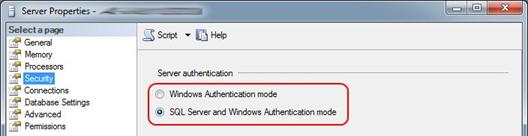
- In Server Properties windows, select Security page.
-
Select SQL Server and Windows Authentication mode, and verify if you have set a correct password to the login sa.
5. Open a remote connection
To verify if your SQL Server is correctly configured, you can open a SQL IDE (like the excellent free tools SqlDbx). In Login page, set the following server string syntax: “tcp:[ServerName\SQLInstance],[Port]” (SqlInstance is empty if you have installed SQL Server with the default instance).
Example:
- Server = tcp:MySqlServer,1433
- Database = Master
- User = sa
- Password = xxx